How to make a (Mac) screen saver that shows your uptime
I am not all that big about screen savers, what with the fact they don’t save screens any more. On the other hand, it can be a good warning that the screen is about to turn off if you do not actually want it to. As such, a nice simple screen saver can still be useful. Blanking to black is fine, but why not make it a little nice?
For a couple of years (at least), I have used a screen saver called ShowOff. The whole purpose is to keep track of your best uptime, and shows your current uptime. There are a lot problems with it, though:
- It has not been updated since January of 2006.
- It only records uptimes when the screen saver is running
- Editing the font requires hand-editing the plist file.
- It occasionally records a random value, thus making it useless.
To handle the last problem, I have been keeping a copy of the preferences and using it to replace the wrong one. Sufficed to say, this is less than optimal. So I decided to go about and make my own. I do have a goal of learning Objective-C someday, but for now using Quartz Composer will do just fine.
To do make this, you need the following tools:
- Quartz Composer. You can get this from Apple’s Developer Tools which come with all Macs, or can be downloaded after getting the free online membership (this of course requires at least Mac OS X 10.4).
- The command-line tool
uprecords. I installed this through the Fink packageuptimed(it is an unstable package). Make sure to dofink describe uptimedto find out how to get it to run at startup. - A Quartz Composer patch called Shell Command Patch. This will allow us to run command-line tools, such as
uprecords. The website that hosts it, Kineme.net, also has a bunch of other interesting patches, so check them out.
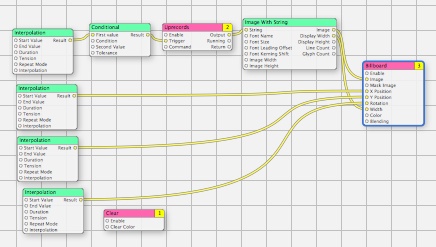
Above is the Quartz Composer project will look like when we are done. This is a really simple project. We will only need nine patches to make, and that is with some (rather) unnecessary rotation I decided to do to make it a little interesting. So let’s get started.
- Make sure to have the developer tools, the Shell Command Patch, and
uprecordsinstalled. I will assume you installeduprecordsusing Fink. - Open up Quartz Composer. After installing the developer tools, it should be in the “
/Developer/Applications/Graphics Tools” folder. - Start with a blank document. To do this, *do not* pick a composition from a template. Instead, hit “Cancel”. Now, if you go to File→New, or simply click on Quartz Composer’s dock icon, you will get a new blank document. Save it in the “
~/Library/Screen Savers” folder in your home folder (the~means it is in your home folder. - On the left, choose the Clear renderer. Using the Inspector tool (in the toolbar with the Information-sign “i”, make sure it is enabled and set the clear color to pure black with 100% opacity.
- From the left, choose the Interpolation controller. Using the Inspector, set
- the start value to 0
- the end value to 1
- the duration to 60 (or however many seconds you want it to run
uprecords. - the repeat mode to loop
- On the left, choose the Conditional numeric. In the Inspector,
- leave the first value blank
- set the condition to “Is Greater Than”
- set the first value to 0.01
- set the tolerance to 0 (you probably can just leave it alone.
- Click and drag from the “Result” of the patch you made in step 5 to the “First value” of step 6. The conditional will now have a result that is true except for the first 1% of however long you made the interpolation last.
- Make a new Shell command patch from the left. In the Inspector,
- make sure it is enabled
- set the command to
/sw/bin/uprecords -M -a. You might need to change the location ofuprecordsif you installed it some other way. And of course, feel free to use a different command. I like to see the statistics of my current uptime in comparison to my past ones, so-Mdoes that for you. You will always want-a, because otherwiseuprecordswill try to make your current run bold with some special characters we are unable to handle well. To find out what is available, typeuprecords --helpin a Terminal window.
- Drag from the result of the patch from step 6 to the trigger of step 8.
- Make an Image with String generator from the left. This rasterizes the output so we can display it. Set
- the font to whatever you want, preferably one that is monospace.
- the font size to 0.025 or whatever you would like
- the image width to 1.5
- the image height to 0.5
- the font leading offset and kerning shift to 0
- Connect from the output of step 8’s patch to the string of step 10’s patch.
- Make a new Billboard renderer from the left. Set the color to white and the blending to “Over”. Make sure it is enabled.
- Connect the image of step 10 to the image of step 12. At this point, click on the Viewer tool in the toolbar if you do not have the viewer open. At this point, you should see the results. We are not done, though, since having the text stay in one place is not a good idea.
- Make a new Interpolation patch from the left. Make sure you have the following:
- the start value to -0.4
- the end value to 0.4
- the duration to 23 seconds (or whatever you would like)
- the repeat mode to “Mirrored Loop”
- the interpolation to linear
- Connect the result from step 14 to the x position of step 12. Your text should start moving left and right
- Make another Interpolation patch, with the following settings:
- a start value of -0.5
- an end value of 0.5
- a duration of 29 seconds (or whatever)
- mirrored loop repeat mode
- linear interpolation
- Connect the result from step 16 to the y position of step 12. Now your text should also go up and down (basically diagonal).
- Make one last Interpolation patch, so that
- the start value is -5
- the stop value is 5
- the duration is 11 seconds or so
- the repeat mode is mirrored loop
- the interpolation is quadratic in-out
- Connect the result from step 18 to the rotation of step 12. The text should start rotating.
And here is what the finished project looks like.
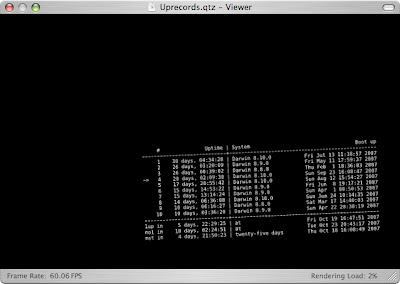
All you need to do is open the “Desktop & Screen Saver” preference pane in System Preferences, and make it your new screen saver.
Finally, don’t forget there is a lot you can change with this switching to a sprite patch (which is 3D instead of the 2D billboard). Messing around with a simple example like this is one of the best ways to learn how to use Quartz Composer.
Technorati Tags: Mac, screen+saver, uprecords
Comments